DevSpace : Deploy & Develop Kubernetes Apps
Posted in Recipe on March 26, 2023 by Venkatesh S ‐ 8 min read
In my practical experience, when building microservices majority of the times we end up struggling using upstream and downstream dependencies of other microservices and third party applications. I always wished if I could build my application locally and run it remotely on a dev cluster so that I do not worry about any of these dependencies during development. I found a few tools in this space but DevSpace has impressed me a lot. In this blog post, I will try to brief on what, why and how to use this tool.
What is DevSpace?
As the website says “DevSpace is a client-only, open-source developer tool for Kubernetes”. It has these key features.
- Build, Test, Debug and Deploy Applications directly inside Kubernetes
- Develop with hot reloading, which means you build your application locally and then it is dynamically deployed on kubernetes cluster without needing to worry about rebuilding images each time a change is made.
- Unify Deployment Workflows within your team and across dev, staging and production.
- Automate repetitive tasks for image building and deployment
How does it work internally?
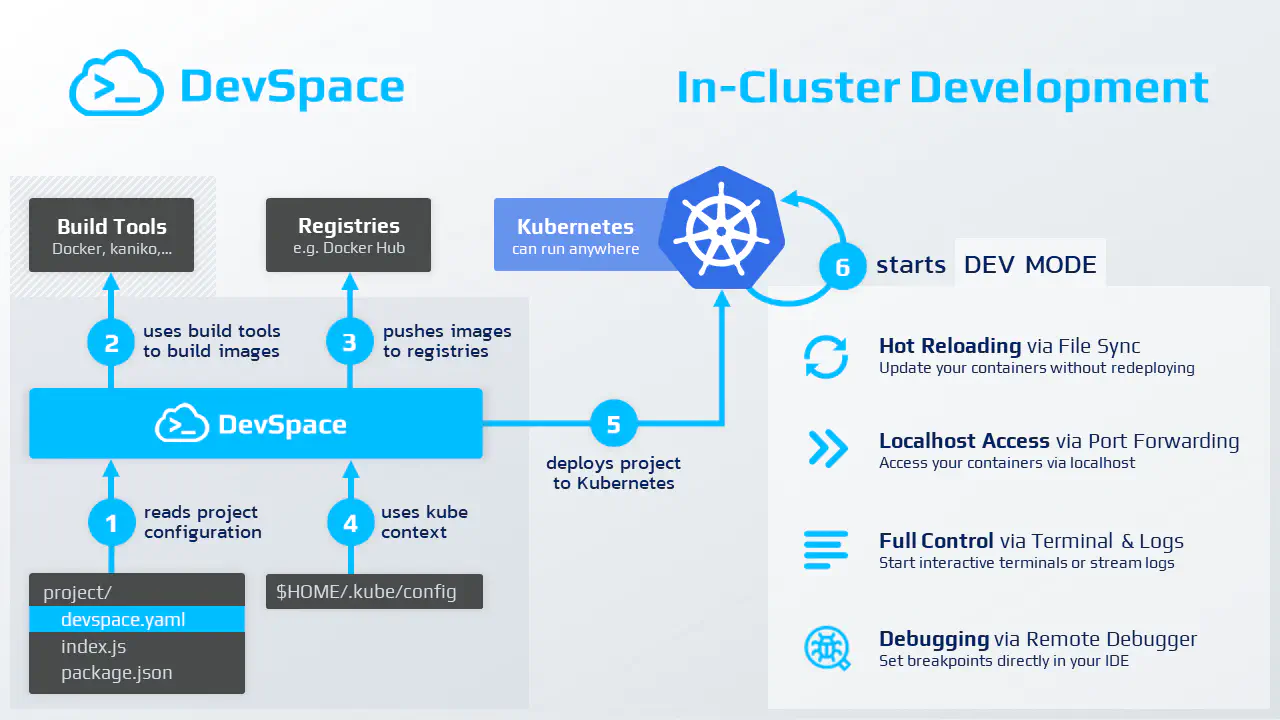
DevSpace runs as a single binary CLI tool directly on your computer and ideally, you use it straight from the terminal within your IDE. DevSpace does not require a server-side component as it communicates directly to your Kubernetes cluster using your kube-context, just like kubectl.
Once the tool is run, your application is now directly running on kubernetes cluster and you can use all the local dependencies on your kube cluster.
Why DevSpace?
- Streamlined Workflow - DevSpace lets you automate all build and deployment steps. You can build images, tag images, push images, deploy using kubectl, helm, resolve cross repository dependencies and integrate easily with your CI/CD cycles.
- Faster Iterations - DevSpace updates your containers in real-time while you’re coding. All dev features like hot reload, 2 way file sync, build caching is available out of the box.
- Feature-Rich UI - DevSpace ships with a built-in UI optimized for development. The UI provides views for namespace inspection, real time log streaming, Status Monitoring and Alerting, having Interactive Terminal Sessions and 1 Click port forwarding.
- Localhost Experience - DevSpace works with your favorite IDE and other developer tools. You will never find that you are developing on a remote kube cluster. You can also get options like multi container log streaming and Interactive terminal sessions for advanced debugging.
- Out of the Box Integration in many IDEs - Use DevSpace in your favorite IDE integrated out of the box.
- Cross-Env Consistency - DevSpace lets you bring dev, staging and production closer together. You will be able to do simple Declarative Configuration, Create new Profiles and Patches, Config Variables across environments and run Custom Commands across environments if required.
Developing using DevSpace
There are 4 steps that you can follow while building applications using DevSpace
- Initialize
- Deploy
- Open UI
- Develop
Initialize

Run the following command from the command prompt.
devspace init
You will start getting a initialization interface. Just follow it. It is as shown below.
     %########%
     %###########%       ____                 _____
         %#########%    |  _ \   ___ __   __ / ___/  ____    ____   ____ ___
         %#########%    | | | | / _ \\ \ / / \___ \ |  _ \  / _  | / __// _ \
     %#############%    | |_| |(  __/ \ V /  ____) )| |_) )( (_| |( (__(  __/
     %#############%    |____/  \___|  \_/   \____/ |  __/  \__,_| \___\\___|
 %###############%                                  |_|
 %###########%


info Detecting programming language...
Select the programming language
? Select the programming language of this project  [Use arrows to move, type to filter]
  c# (dotnet)
> go
  java-gradle
  java-maven
  javascript
  php
  python
Select the deployment process
? How do you want to deploy this project?  [Use arrows to move, type to filter]
> helm
  kubectl
  kustomize
Select preferred way of deployment
? Is this a DevSpace Quickstart project?  [Use arrows to move, type to filter]
> Yes
  No

? Do you want to develop this project with DevSpace or just deploy it?  [Use arrows to move, type to filter]  [Use arrows to move, type to filter]
> I want to develop this project and my current working dir contains the source code
  I just want to deploy this project
Select option for building the container images
? How should DevSpace build the container image for this project?  [Use arrows to move, type to filter]
> Use this existing Dockerfile: ./Dockerfile
  Use a different Dockerfile (e.g. ./backend/Dockerfile)
  Use alternative build tool (e.g. jib, bazel)
  Skip / I don't know
Select the container registry option
? If you were to push any images, which container registry would you want to push to?  [Use arrows to move, type to filter]
> Skip Registry
  Use hub.docker.com
  Use GitHub image registry
  Use other registry
Now you should see a screen which says that project has been initialized successfully.
done Project successfully initialized
info Configuration saved in devspace.yaml - you can make adjustments as needed

You can now run:
1. devspace use namespace - to pick which Kubernetes namespace to work in
2. devspace dev - to start developing your project in Kubernetes

Run `devspace -h` or `devspace [command] -h` to see a list of available commands and flags
After running devspace init, you will see 3 changes in your project:
- New file devspace.yaml (tells DevSpace how this project should be build, deployed, and developed)
- New file devspace_start.sh (is used to show information to the user when the terminal for the dev container opens)
- Added .devspace/ folder to .gitignore (the .devspace/ folder is used by DevSpace to store some information locally when you are working with this project, e.g. caching to speed up things)
A sample DevSpace file should look like below.
version: v2beta1
name: devspace-quickstart-golang

# This is a list of `pipelines` that DevSpace can execute (you can define your own)
pipelines:
  # This is the pipeline for the main command: `devspace dev` (or `devspace run-pipeline dev`)
  dev:
    run: |-
      run_dependencies --all       # 1. Deploy any projects this project needs (see "dependencies")
      create_deployments --all     # 2. Deploy Helm charts and manifests specfied as "deployments"
      start_dev app                # 3. Start dev mode "app" (see "dev" section)
  # You can run this pipeline via `devspace deploy` (or `devspace run-pipeline deploy`)
  deploy:
    run: |-
      run_dependencies --all                            # 1. Deploy any projects this project needs (see "dependencies")
      build_images --all -t $(git describe --always)    # 2. Build, tag (git commit hash) and push all images (see "images")
      create_deployments --all                          # 3. Deploy Helm charts and manifests specfied as "deployments"

# This is a list of `images` that DevSpace can build for this project
# We recommend to skip image building during development (devspace dev) as much as possible
images:
  app:
    image: ghcr.io/loft-sh/devspace/app
    dockerfile: ./Dockerfile

# This is a list of `deployments` that DevSpace can create for this project
deployments:
  app:
    # This deployment uses `helm` but you can also define `kubectl` deployments or kustomizations
    helm:
      # We are deploying this project with the Helm chart you provided
      chart:
        name: component-chart
        repo: https://charts.devspace.sh
      # Under `values` we can define the values for this Helm chart used during `helm install/upgrade`
      # You may also use `valuesFiles` to load values from files, e.g. valuesFiles: ["values.yaml"]
      values:
        containers:
          - image: gentele/app
        service:
          ports:
            - port: 8080

# This is a list of `dev` containers that are based on the containers created by your deployments
dev:
  app:
    # Search for the container that runs this image
    imageSelector: ghcr.io/loft-sh/devspace/app
    # Replace the container image with this dev-optimized image (allows to skip image building during development)
    devImage: ghcr.io/loft-sh/devspace-containers/go:1.18-alpine
    # Forward the following ports to be able access your application via localhost
    ports:
      - port: "2345"
      - port: "8080"
    # Open the following URLs once they return an HTTP status code other than 502 or 503
    open:
      - url: http://localhost:8080
    # Open a terminal and use the following command to start it
    terminal:
      command: ./devspace_start.sh
    # Sync files between the local filesystem and the development container
    sync:
      - path: ./
    # Inject a lightweight SSH server into the container (so your IDE can connect to the remote dev env)
    ssh:
      enabled: true
    # Make the following commands from my local machine available inside the dev container
    proxyCommands:
      - command: devspace
      - command: kubectl
      - command: helm
      - command: git

# Use the `commands` section to define repeatable dev workflows for this project
commands:
  migrate-db:
    command: |-
      echo 'This is a cross-platform, shared command that can be used to codify any kind of dev task.'
      echo 'Anyone using this project can invoke it via "devspace run migrate-db"'

# Define dependencies to other projects with a devspace.yaml
# dependencies:
#   api:
#     git: https://...  # Git-based dependencies
#     tag: v1.0.0
#   ui:
#     path: ./ui        # Path-based dependencies (for monorepos)
Deploy

Select the namespace where you would want to deploy your application.
devspace use namespace demo-space
You can check that a new pod has been deployed by running the following command.
kubectl get po
Open UI

Execute the following command to open the UI.
devspace ui
Develop your Application and Enjoy!

You can now modify your code, develop your application and see all the action on kubernetes.
References
More details available on https://www.devspace.sh/
Documentation available on https://www.devspace.sh/docs/getting-started/introduction